Tuesday 15 October 2019

1.5kW CNC Generic Air-cooled Spindle Power Curve profile for HSMAdvisor

One important factor in determining the best Feeds and Speeds for a CNC router depends on how well we defined the capabilities of our router and spindle in our CNC feeds and speeds calculator software such as GWizard or HSMAdvisor.

On my CNC 3020 router which I put together as a bag of random bits bought off AliExpress, I had decided to go with a Generic 1.5kW Air-cooled cnc spindle. I had contacted the manufacturer for the torque-power curve chart related to the spindle but I received no plausible response. Even the spindle specifications mentioned on most AliExpress and Ebay listings seemed to be a bit vague and over estimated. Some listings for 1.5kW spindles had torque-power curve profiles copied from 2.2kW spindle listings. So, basically there was always some uncertainty in the information.

Several people have been using such spindles on their routers with great success after tweaking the parameters based on practical experience and best guesses, but I wanted something that was mathematically sensible. After putting several hours building the machine, the last time I wanted was something catastrophic happening. So I decided to do my research first before diving in to the deep end with no previous CNC experience.

I was playing with a demo version of the HSMAdvisor to determine some usable feeds and speeds for cutting T6061 aluminium and there were several machine profiles available for download from the cloud. One specific profile related to Generic Chinese CNC spindles is also provided but the profile seems too generic as below:


The above machine profile in HSMAdvisor seems to have been created in HSMAdvisor using the Power Curve Wizard and is a bit far from theoretical expectations of such high rpm spindles.

In an effort to create a real life usable machine profile, I started researching into the torque power curves for similar 1.5kW cnc spindles and it seemed most European manufactures were fairly transparent with regards to the specifications and torque power curves of the spindles they were selling.

Below is one such example of a 1.5kW spindle motor from a German manufacturer with similar power, rpm ranges and over all design:


I also found a power curve for another 1.1kW spindle motor from another German manufacturer as below:


Next, I wanted to calculate the best match torque-power curve for my generic Chinese CNC spindle using the specifications from information I gathered from various European manufacturers. To do this I had to understand the science behind torque & power curves and their relationship to motor specifications.

The German manufacturer that I borrowed the previous power curve charts also provided FAQ's related to the science behind how the power and torque of a motor are related to RPM etc as follows:


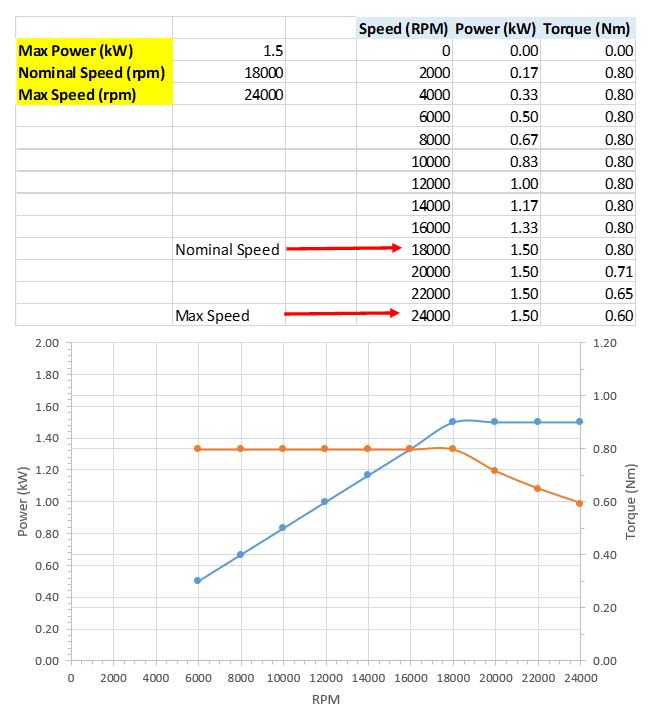
 Now, I had enough information and proceeded to Excel to do my calculations:


Now, I was ready to create a best fit profile for my generic cnc spindle in HSMAdvisor:


At first, the resulting graph did not look very clean or refined as there curves appeared irregular, but then there must be something not perfect with the way graphs are plotted in HSMAdvisor.

I also reduced my Max Feed as my router cannot exceed 800mm/min before stalling while traversing an axis (something I realized via the Motor tuning wizard in Mach3).Stepper motors have their own torque curves which clearly indicate alot of torque in the low rpm ranges and I do not expect to chew through metal on a small router as a industrial grade cnc milling machine.

With the power curve setup in HSMAdvisor, I proceeded to calculate feeds and speeds for milling and drilling Al T6061 and machineable wax. The result was amazing, I made my first test parts on a tiny 3020 router with a 1.5kW spindle without any hiccups- no motor stalls, no broken milling bits, no jams.

Friday 8 February 2019

DRO Mix n Match for SX2P mill

Its 2019 now and several cheaper options exist for DROs. You just need to shop around. Ebay, AliExpress, etc.

Magnetic DRO packages are a lot cheaper now than they used to be a few years ago. (I am not talking about digital linear scales here but the actual magnetic scales here).

I always wanted a DRO set for my SX2P and SC2 but the size of the cheap digital scales or glass scales always put me off. But magnetic scales have a much smaller sized head and are easier to mount in tight spaces and offer almost negligible loss of travel or interference with machining activity. 

LittleMachineShop has guided instructions somewhere on their website describing the optimal way of mounting it a Sieg Magnetic DRO scale to a mini lathe or a mini mill. 

One of my local Sieg re-sellers had the Sieg magnetic reader heads on sale for a attractive price and I quickly bought 2 along with magnetic scales. They are out of stock now else I would have bought a few more for the SX2P Z axis and the SC2.

The magnetic reader heads had information for the various coloured wires as follows:

Yellow=A, Brown=B, Grey=Z, Red= 5VDC and White=0V

After some searching on the web I realized most of these scales have the same generic dimensions, 5 micron resolution and supported 5V TTL/RS422 signal connections. 

You can find the same generic magnetic read heads sold under various brand names all over Ebay/Aliexpress.

Once I had the magnetic reader heads and scales, I started shopping around for the DRO display unit or the bluetooth tablet based DRO display option. 

I found a Ditron D50_3V dro unit for a reasonable price on Aliexpress. It supported reading the same 5V TTL/RS422 signal but required DB9 pin serial connectors.

I then bought a pair of no weld DB9 connectors to wire the magnetic read heads with the DRO display unit.

The wiring sequence I used is: Yellow=A= Pin 6, Brown=B= Pin 8, Grey=Z= Pin 9, Red=5VDC= Pin 7 and White=0V= Pin 2.

After some quick setup of the DRO display following the instruction manual, the setup worked.

Overall the above mix and match setup was a bit of a risk but only costed me around A$ 350.

I have not mounted the DROs on my SX2P yet but I am happy with the quick tests.

Tuesday 2 August 2016

Sourcing bits and pieces for my CNC router build

Several months ago I decided to step into the world of CNC machining.

I had a 3d printer for some time now and it was put together via a DIY kit and it has thought me alot in terms of how CNC machines operate and communicate with software that prints your CAD design. Although 3d printing is additive manufacturing vs milling that is substractive manufacturing, but the basic concepts of the machine design are very similar.

I started thinking if I should CNC my existing SX2P mill and SC2 lathe. Although the platform is rigid enough, I just did not want to make swiss cheese out of my machines by drilling holes and tapping them. I decided that it was best i left these machines for manual operations as it is not always practical to go onto CAD and CAM simply to drill a few holes or a pocket.

I saw several people posting on the internet about building CNC routers using MDF board and a dremel like tool. They seem to show good success but mostly in softer materials.

I wanted something a bit more rigid and yet not to go bankrupt over it.

Shopping online on Aliexpress, I noticed several CNC engravers on sale in the US$ 1k-2k range. Although the frames were rigid enough, these machines lacked powerful spindles or steppers and were using very old and cheap grade electronics.

So I thought if I do buy a ready machine, I am going to spend alot of money modifying the machine for my liking.

The good news is that that manufacturers of these machines are also selling the frame kits without any motors or electronics. This gave me a starting point. 

I didnt want a router that was too huge and thus I settled on the 3020 size of cnc.

Since then I have been purchasing lots of bits and pieces for my CNC router and I am now complete in terms of putting my CNC machine together. The waiting and collecting parts period is well over a few months as this included reasearching, budgeting funds, ordering and waiting for parts to be shipped.

The following is a big list of all the small parts I have had to collect to put together the CNC machine (prices do not include shipping):

3020Z DIY Frame Kit (ball screw design) US$ 350


4 axis 100khz Mach3 compatible USB Breakout Board - US$ 40

3 sets Nema23 287oz.in dual shaft Bipolar Stepper Motors (57BYGH603B) with matching Stepper drivers (DQ542MA) - US$ 150


1.5kw Air Cooled Spindle - US$ 90


1.5kw VFD - US$ 88

400w 36v 11a switching power supply - US$ 32

60w 12v 5a switching power supply- US$ 7
Laser cut acrylic electronics enclosure - US$ 25

Shielded electrical cabling - US$ 65

Limit switches (10pcs) - US$ 3

E-Stop switch - US$ 2

23 Nema Aluminum stepper motor mounts  - US$ 19

6.35mm to 8mm motor shaft couplings - US$ 4

6.35mm ID aluminum knurled handwheels (3pcs) - US$ 10

Power switches (3pcs) - US$ 2

Panel mount power outlets (2pcs) - US$ 3

Panel mount usb type B 50cm extension - US$ 2

AC EMI power filter- US$ 11

GX16 4 pin connectors (5 pcs) - US$ 5

GX16 2 pin connectors (4 pcs) - US$ 4

AC cooling fan 90mm - US$ 9

DC cooling fan 40mm (2 pcs) - US$ 3

18x25mm cable drag chain (1m) - US$ 7

18x25mm cable drag chain ends - US$ 2

Z Axis touch plate tool - US$ 5

10 position common grounding terminal - US$ 1
Miscellaneous bits & pieces (wiring terminals & connectors, heat shrink tube, fan grills, screws and nuts, adhesive cable holders, etc) - US$ 20

The rough total cost is under US$ 1000 for sourcing the various components. Please note the pricing is excluding shipping costs as this will depend on your location and your final source for the various parts.

The next challenge will be putting these parts together as all my tools are still packed up in storage. The wiring is my biggest concern as without my soldering station and magnification clamps using a cheap soldering iron is not going to be very clean. Then after a new dilema to tune the machine for use with Mach3.

Will it all work in the end, I cant be too certain till i have it all hooked up and tuned in but I am sure I will be able to retrofit everything. 

For me the catch is a much powerful air cooled spindle(i wanted to avoid the hassle of a water cooled spindle), bigger stepper motors with independent drivers, accurate ball screws, thick and rigid frame, USB connectivity as most cheap CNC machines rely on obselete parallel port computers, higher quality insulated electrical cabling and other bits to control electrical noise.

I hope this info to someone who is thinking of buying an off the shelf CNC machine bs building one yourself.


Saturday 30 July 2016

My journey in desiging a Laser cut Electronics enclosure

Over the last few weeks, I had been busy in my spare time trying to look for a pre-fabricated electronics enclosure for my CNC machine. After extensively looking around my inner DIY gut feelings pushed me towards the custom route again. After looking around the internet, I was impressed by the various CNC electronics enclosures that other folks around the world were making to house the electronics.

I was at a stage where all the required electronics components I required were in my possession and I decided to take on a new adventure of designing a laser cut acrylic enclosure.

I am quite comfortable using FreeCAD for my 3d printing design work but the software lacked the ability to make tabbed boxes. I did find a few options via FreeCAD and Inkscape but it was going to be very very hectic making things work especially with all the different formats such as .SVG, DXF, etc.

I stumbled across a website called www.makercase.com . It has a nice and simple online interface where you can with a few basic inputs quickly design a tabbed box and export an .SVG file with the design. If you want a quick tutorial on MakerCase.com you should have a quick look at this youtube tutorial: https://www.youtube.com/watch?v=ptcxaANWrRM

Below is a snap shop of the MakerCase.com website:

After designing the basic tabbed enclosure, I exported the .SVG file and started working in FreeCAD.

Below is an example of the MakerCase exported .SVG file imported in FreeCAD:

At this stage I started carefully editing the design in FreeCAD to add the necessary holes to house the various electronic components.

Below is the final design in FreeCAD:

The design work in FreeCAD was well over a couple of hours but its a tough argument over using expensive CAD applications as both MakerCase and FreeCAD are free.

Then came the next phase i.e. to search of a company than can laser cut the acrylic pieces for me, I had quotes that were all over the place and finally found a reasonable company called Lasertec Sdn. Bhd. They offered laser cutting in acrylic, wood and aluminium and they cater for small or large quantities. As such there is no limit on size and quantity while dealing with Lasertec but the terms are basically Cash/Bank Transfer and self collection. You can even provide your own material and they will just charge you the laser cutting cost but I would advise you do some research before you decide to get your own material as not all acrylic or wood will give good results during laser cutting.

Lasertech has a website where you can see a quick description of their products and services: www.lasertec.com.my . After a few emails and sending them the CAD design in .DXF format, they gave me a quote of RM 106 (inclusive of GST) for cutting the design in 3mm Acrylic. After making payment to them via Online bank transfer my laser cut pieces were ready for pickup next day.

Below is a quick picture using my phone showing the final laser cut acrylic pieces:

The complete details for Lasertec are below:
Name: LASERTEC SDN. BHD.
Address: No. 2E, Jalan Wangsa Utama, Taman Wangsa Permai 52100 Kepong, Kuala Lumpur
Telephone: +603 2632 2045
Email: sales@lasertec.com.my
Website: www.lasertec.com.my

In the end I am very satisfied with the result. The laser cut pieces are perfect in terms of dimensions apart from a few burns which is a signature of laser cutting acrylic or wood. It saves you a lot of time hacking plastic of metal electronics project boxes to house the various components.

I hope anyone with a desire or need to design an electronics project enclosure will find this post useful.

Tuesday 12 July 2016

Electronic Supply Source Rewiew

Today I went back to Jalan Pasar to look for some electronic components for my cnc electronics enclosure and I happened to go back to a very old electronics and pcb component supplier: Maplin Electronics. 

The shop details are:

Shop: Maplin Electronics SDN BHD
Address: No. 4, Jalan Landak, Off Jalan Pasar, Pudu, 55100 Kuala Lumpur.
Telephone: 03-92224496


This is a very humble shop that sells several electronic IC's, resistors, capacitors, raw pcb boards, electronic enclosures (plastic/metal), power switches, AC fans (along with fan grills), all kinds of connectors including aircraft type round connectors, DC stepping power supplies, soldering equipment, etc.

Although shopping online for electronic components might be a but cheaper but if you wish to look for a physical location where you can see/touch the components then Maplin is a good place to start and belive me you will not regret visiting this shop.

One other thing I must advise is that the displayed price or quoted price is not the  final price. You can ask for a decent 10-20% discount and they will be willing to entertain you and negotiate a little if you look like a serious buyer.

The staff is very helpful and the environment is quite pleasant and peaceful compared to the noisy shops on main Jalan Pasar who only seem to focus on lighting and musical components.

Note: The area is normally congested with traffic and parking your vehicle may become an adventure you may not be prepared to encounter.

Monday 13 June 2016

Hobby stores are starting to emerge in Malaysia

I was casually browsing the internet looking for some diy material to build a cnc enclosure for a cnc machine that I have left half baked on the back burner and stumbled upon an interesting post on Lowyat.net posted on 1st June 2016: 

https://forum.lowyat.net/topic/3963660/all

I have no affiliation with the person but it seems he has setup a new online shop by the name www.Hobby-Hardware.com

They even have a store registered at Lelong.my if you feel safer.

You can refer to the information in the lowyat link posted above for some prices he has to offer for a quick comparison.

I am more excited about the fact that they are offering a reasonable price for aluminium extruded profiles, linear hardened shafts etc, and even various 3d printing consumables such as filaments, nozzles e.t.c on their website.

They offer cutting extrusions at custom length and also shipping within Malaysia and COD at specific locations in Klang Valley.

I assume that finally people are starting to realize that there is a small hobbyist group in Malaysia that is interested in building their own 3d printers and cnc machines.

Hopefully in the near future we will have more of such shops where hobbyists can source their project raw materials.

I hope this info will be beneficial to someone who is looking for raw material to build or maintain their own custom 3d printers or cnc machines.

Friday 3 June 2016

Visit to METALTECH @ PWTC

METALTECH 2016 took place at Putra World Trade Center (PWTC) from 25-28th May.

Although the fair is more geared towards commercial visitors, I decided to pay a visit.

I visited their website at http://www.metaltech.com.my and noticed that they offered a simple online registration. Upon visiting the registration counter I presented them my online registration email and they requested my business card. In a couple of minutes i had my visitor badge and was on my way to explore the 6 fully packed halls.

There were all sorts of vendors selling CAD/CAM softwares, 3d printers, CNC machining centers, lots of tools, bits, inserts, welding equipment e.t.c. Most of the pricing was commercially focused and beyond the reach of us hobby machinists and DIY folks.

I did pass by a few vendors selling small bench size lathes and mills (mainly from China & Taiwan), vises, sine plates, angle plates, rotary tables, vee blocks, indexing tools, lots of popular brand measurment tools such as calipers, height guages, indicator gauges e.t.c. 

There were also several vendors selling  power tools, metal bending machines, bandsaws, arbor presses, hydraulic presses, e.t.c.

There were also several companies selling CNC parts such as stepper motors, spindles, vfds, stepper drivers, ballscrews, bearings e.t.c. I was not very impressed with the prices as I can find attractive prices online via AliExpress.

So, you must be wondering if I bought anything? Well, the only thing i found worth buying was a 1 pint (0.473 litre) bottle of Tap Magic ProTap cutting fluid. The picture below is just for a reference but I got a similar bottle for RM 25 which to me is very reasonable compared to online prices and the hassle of importing fluids from USA. I actually regret misplacing the vendors business card in the pile of brochures I had collected during the fair. But hopefully a can of this stuff will last me a very long time.


All in all it was a good experience knowing the technology that exists in the commercial manufacturing world.

Allthough MetalTech was not an open public fair and you needed to be part of a commercial venture just to get in but enterance is free and remember "where there is a will, there is a way".

I would recommend DIY hobbyists to visit the next MetalTech which takes place every year (once a year). You may definitely find it useful if you are more focused towards sourcing your hobby ewuipment locally to benefit from customer service and support.